
Open Settings from the Dock (the app bar at the bottom of the screen), then select
Data Model under Workspace Settings and open Pixel. Admin access is required.
Domains
The Domains tab lists every website you’ve added the Pixel to, along with its connection status.Add a domain
1
Add a new domain
Select Add new Domain and enter your website address (for example,
https://www.acme.com).
This registers the domain so the Pixel knows to track it.2
Copy the Pixel script
Default shows the
<script> snippet with your workspace’s public key already filled in. Copy it.
You can come back to it anytime with Copy Pixel script.3
Install and test
Add the snippet to your site (see Install the Pixel below), then run the
connection test back in Default.
acme.com and try.acme.com), add each one here so the Pixel
tracks it, then install that same snippet on each. The Forms tab only shows forms detected on
domains you’ve added.
Domain status
Each domain shows a status so you know whether the Pixel is working:
To stop tracking a site, open the domain’s menu and select Remove.
Install the Pixel
The snippet Default generates looks like the example below. Your real snippet has your workspace’s public key already filled in, plus built-in retry handling, so copy it from the Domains tab rather than typing it by hand.<head> of every page you want to track. The simplest
way to cover a whole site is to add it to your site-wide template or layout, or to add it through a tag
manager (such as Google Tag Manager) as a custom HTML tag that fires on all pages.
A few things worth knowing:
- It loads asynchronously and starts itself. The snippet sets your public key on
window.__defaultPixel__, loads the Pixel in the background, and initializes automatically once the page is ready. There’s no other code to write. - The public key is safe to expose. The
keyvalue is a public key meant to live in client-side code. - Single-page apps are supported. The Pixel follows client-side route changes, so a React, Vue, or other single-page app needs no extra setup.
- One snippet for the whole workspace. Your workspace has a single public key, so the same snippet works on every domain you add. Adding a domain is what tells the Pixel to track that site; it does not produce a different snippet.
Verify the installation
After the snippet is live, run the connection test on the domain in Default. It confirms each step in order:1
Snippet added
Default confirms the snippet is present on the page.
2
Pixel detected
Default confirms the script loaded and initialized.
3
Test event received
Default sends and receives a test event to confirm data is flowing.
<head> of the page you’re testing, that it isn’t
blocked by a content-security policy, and that you’re testing a page where the Pixel is allowed to run
(see Capture controls below).
What the Pixel captures automatically
Once the script loads, the Pixel works on its own. No per-form setup is needed.- Form submissions, including forms added to the page after it loads (for example, in modals or after navigation). Common third-party form tools are recognized too, including HubSpot, Marketo, Pardot, and Paperform.
- Page activity, such as page views and basic session context, so submissions have context.
Capture controls
- Turn off capture on a page by adding this to the page’s
<head>: - Sensitive pages are skipped by default. The Pixel does not capture forms on common account and
checkout paths, such as
/login,/signin,/account,/checkout,/oauth, and/admin.
Forms
When the Pixel sees a form on one of your connected domains, that form appears on the Forms tab. Each form shows its name, the domain where it was seen, and the fields the Pixel detected. The first time someone loads or submits a form on a tracked page, Default reads its structure: the form’s name, its fields, and the field types. This can take a few minutes to show up, so on a low-traffic page you may want to load the page yourself to speed things along. Turn on Allow Pre-Enrichment on a form to let Default enrich a submission before it’s processed, so records arrive already filled in with company and contact detail.Review and approve forms
New forms don’t go live on their own. On the Forms tab, select Save changes to open the review dialog, check what Default detected, and approve the forms you want to track (skip the ones you don’t). Approving a form tells Default this is the correct shape of the form going forward, so a later change to your site, such as a renamed or added field, doesn’t quietly change what your workflows receive. If an approved form changes later, Default flags it with an unaccepted field changes alert. Reviewing it the same way keeps your forms in sync without breaking the workflows that depend on them.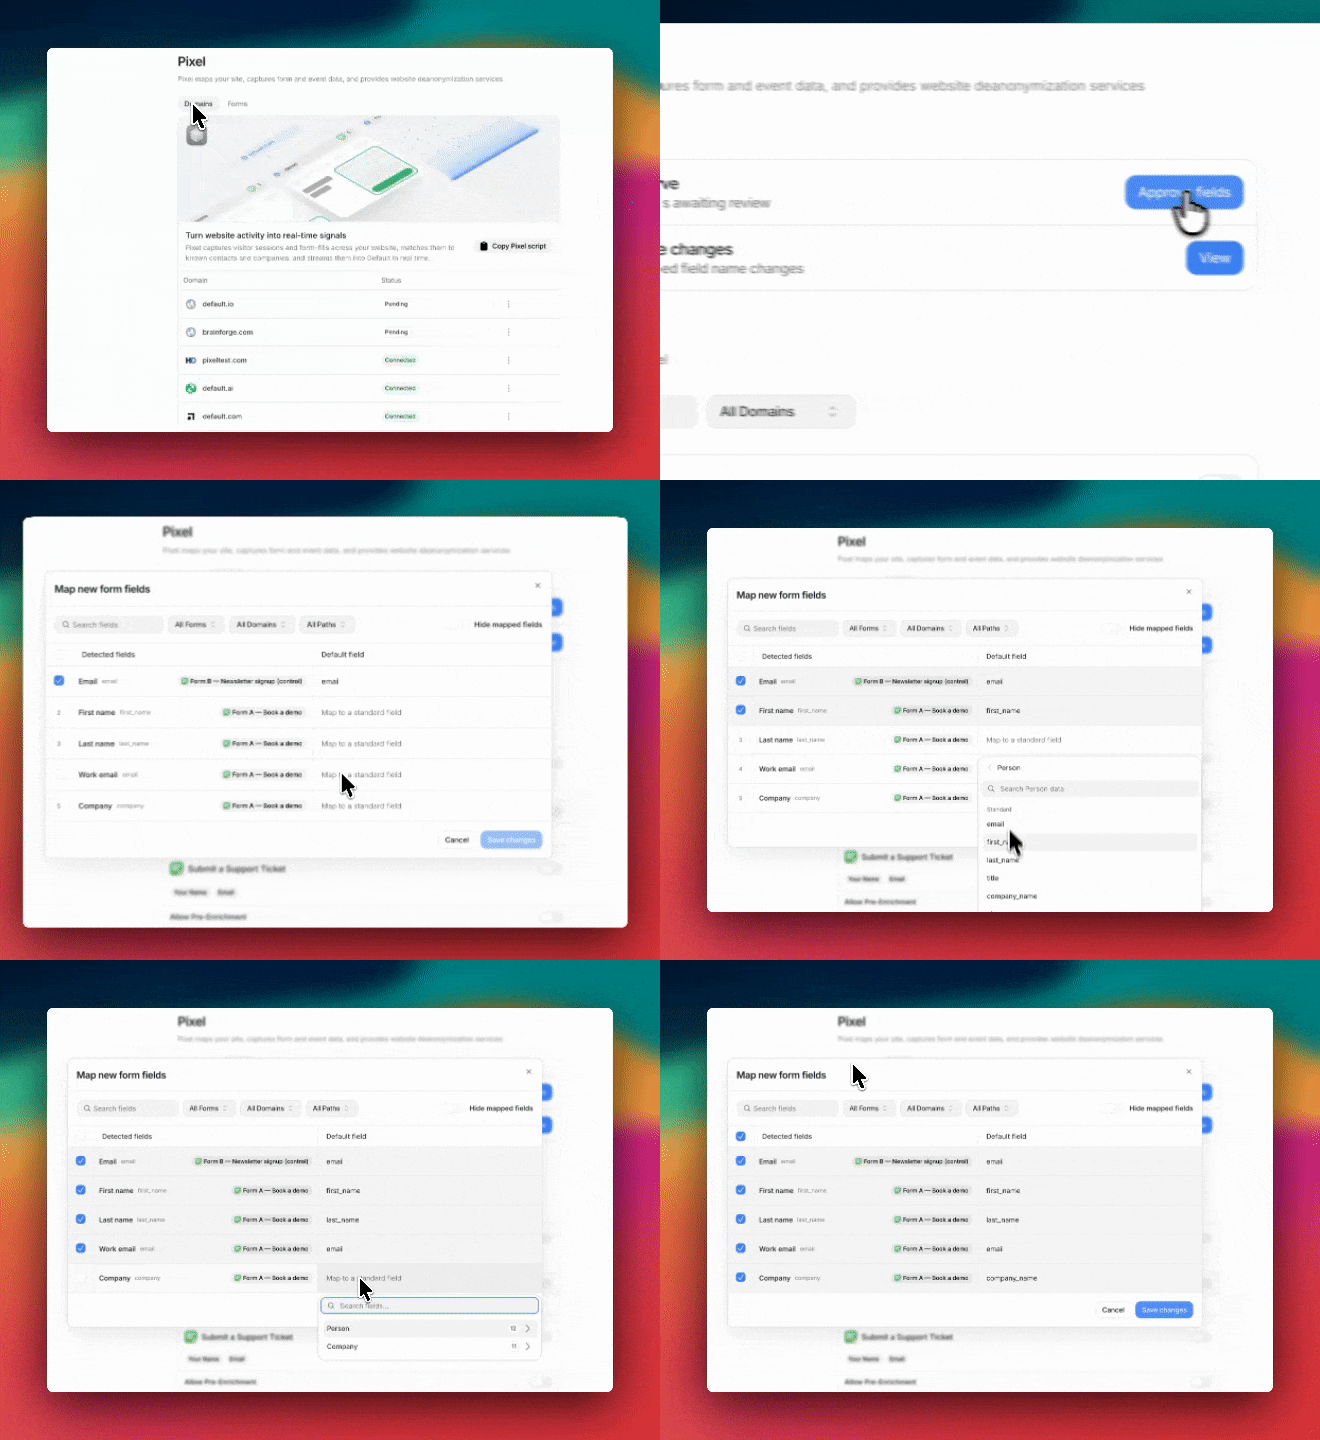
Map form fields
So that submissions land on the right fields, you map each detected form field to a field on your Person or Company records. When the Pixel finds a new form or new fields, Default prompts you to review them.1
Open the field mapping
When new forms or fields are detected, open the review dialog from the prompt on the Forms tab.
2
Match each field
For each detected field, the dialog shows its label, name, and input type. Use the dropdown to map
it to a standard or custom field, grouped under Person and Company. Use the search and
filters (by form, domain, or path) to work through long lists, and turn on Hide mapped fields
to focus on what’s left.
3
Save your mapping
Select Save to confirm the mapping and approve the form. New submissions then populate the
fields you mapped.
Use a form in a workflow
Once a form is approved and mapped, it’s available in Workflows as a target for the Form Submission trigger. Create a workflow, add a Form Submission trigger, and choose your form. Everything a visitor submits then runs through that workflow for routing, enrichment, scoring, and scheduling.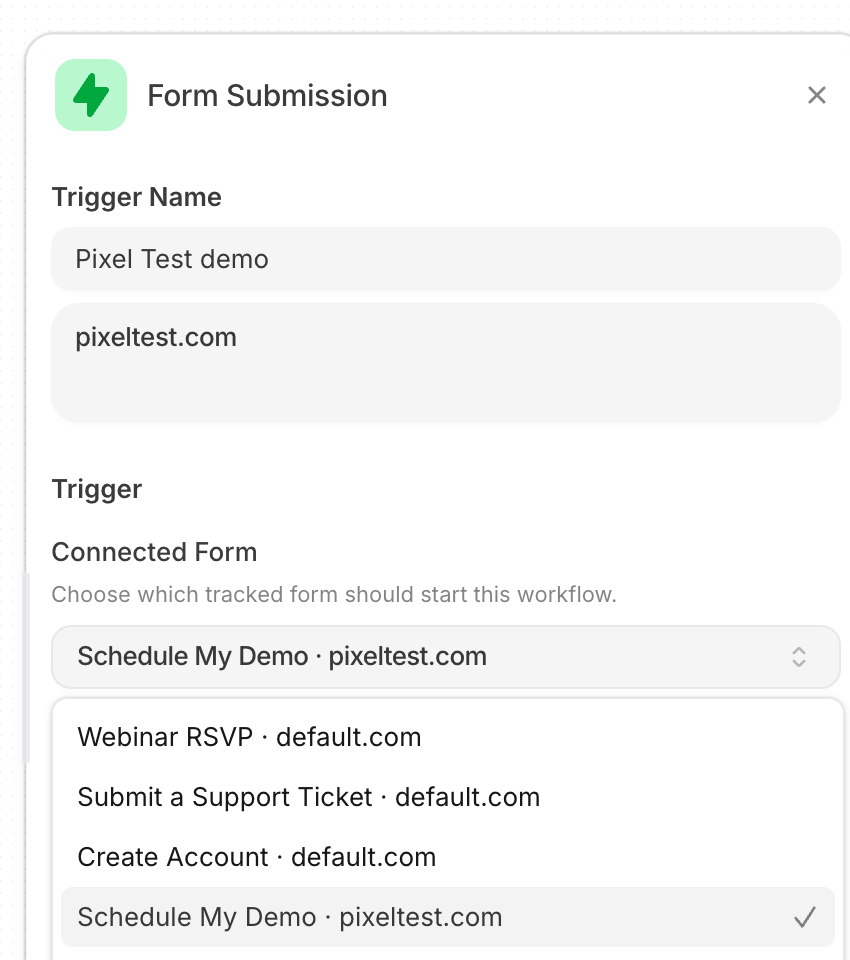
Advanced: the Pixel SDK
For programmatic control, Default also ships a manual SDK (sdk.js) that exposes
window.DefaultPixelSDK. Use it when you want to submit a form to Default yourself, or embed and listen
to the Default scheduler. Load it the same way as the Pixel, with sdk.js in place of index.js. Most
sites that use the SDK load both scripts.
key your Pixel uses and initializes itself once it loads. If you’d rather set
it up in code (for example, to configure options dynamically), call
DefaultPixelSDK.init({ publicKey: "a1b2c3d4-e5f6-7890-abcd-ef1234567890" }) instead.
Submit a form
Build an object of field values and callsubmitForm. The pixelFormId is the ID Default assigned the
form when you approved it on the Forms tab.
email, first_name, company_domain, and so on)
so the submission lands on the right record fields.
Show the scheduler
If a workflow attached to the form returns a scheduler link, the SDK can display it three ways. Pick the one that fits your page.- Modal (default). The SDK opens a centered calendar and closes it when the visitor books, cancels,
or the session times out. Nothing to configure:
- Inline. The SDK mounts the calendar inside a container you’ve set aside on the page, so it feels
like part of the page rather than a popup:
- Off. The SDK displays nothing. Read the link off the result and handle it yourself:
Listen to scheduler events
Whatever display mode you use, you can react to scheduler activity, which is useful for analytics, ad conversions, or notifications:onDisplayed, onClosed, onMeetingBooked, onMeetingCancelled, and
onMeetingTimeout. To open the scheduler yourself, call scheduler.display(url, option), where url
is the scheduler link from result.scheduler.url and option is the same modal, inline, or off value
that autoDisplayScheduler accepts.
Handle errors
submitForm does not throw on failure. It resolves with success: false and a status code, so check
the result:
- 404: the
pixelFormIddoesn’t belong to your workspace. Check that you copied the ID from a form on a domain you’ve added. - Network or server errors: these come back as non-success statuses. Retry, or fall back to your own thank-you message.