
Open Settings from the Dock (the app bar at the bottom of the screen), then select
Data Model under Workspace Settings, then Waterfalls. Admin access is required.
Waterfalls list
The Waterfalls page opens with a Primary Waterfall banner and a card grid of all your waterfalls.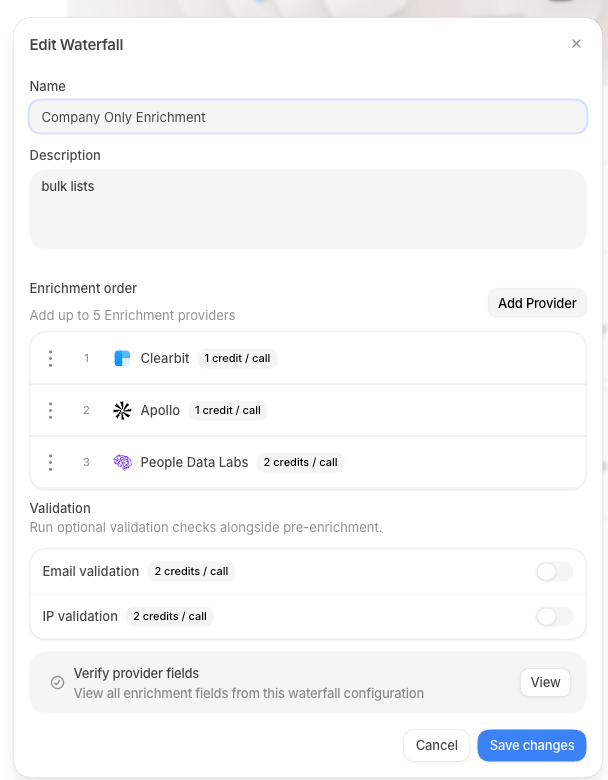
Primary waterfall
The Primary Waterfall banner at the top of the page lets you designate one waterfall as the workspace default. The primary waterfall is used for enrichment requests made by workflows when no specific waterfall is referenced. Select a waterfall from the Primary Waterfall dropdown to set it. Each card in the grid shows the waterfall’s provider icons, name, and the maximum number of enrichment credits it can consume per call (the sum of all providers’ per-call costs, in a worst-case scenario where every provider is tried). A Primary badge marks the current primary waterfall.Search
Use the Search Waterfalls bar to filter cards by name or description.Create a waterfall
Select New Waterfall to open the creation dialog.1
Name and describe the waterfall
Enter a Name for the waterfall (for example,
Email Finder). Add an optional
Description to explain its purpose, such as
Tries Apollo then Clearbit to find a verified work email.2
Add and order providers
Under Enrichment order, select Add Provider to open the provider picker. You can
add up to 5 providers per waterfall. The available enrichment providers are:
Each provider row shows its position number and the credit cost per call. Drag the handle
on any row to change the order. The provider at position 1 is tried first.To remove a provider, hover the row and select the trash icon.
3
Verify provider fields (optional)
Once you have at least one provider selected, an alert appears offering to View the
enrichment fields that the current provider set can return. Select View to open the
provider fields panel and confirm the waterfall covers the fields you need before saving.Select Back to return to the form.
4
Save
Select Create Waterfall. The new waterfall appears in the card grid.
Edit a waterfall
Hover a waterfall card and select the pencil icon, or open the card’s context menu and choose Edit. The edit dialog is identical to the creation dialog. Update the name, description, or provider list and select Save changes.Set a waterfall as primary
To change which waterfall is primary, either:- Use the Primary Waterfall dropdown in the banner at the top of the page, or
- Open a waterfall card’s context menu and select Make Primary.
Delete a waterfall
Open a waterfall card’s context menu and select Delete. A confirmation dialog appears with the waterfall’s name. Confirm to permanently remove it. Deletion cannot be undone.Before deleting a waterfall, check whether any workflow enrich nodes reference it. Those
nodes will stop resolving a waterfall after deletion.