> ## Documentation Index
> Fetch the complete documentation index at: https://docs.os.default.com/llms.txt
> Use this file to discover all available pages before exploring further.
# Users
> View and manage every member of your workspace: roles, profiles, availability, integrations, and notifications.
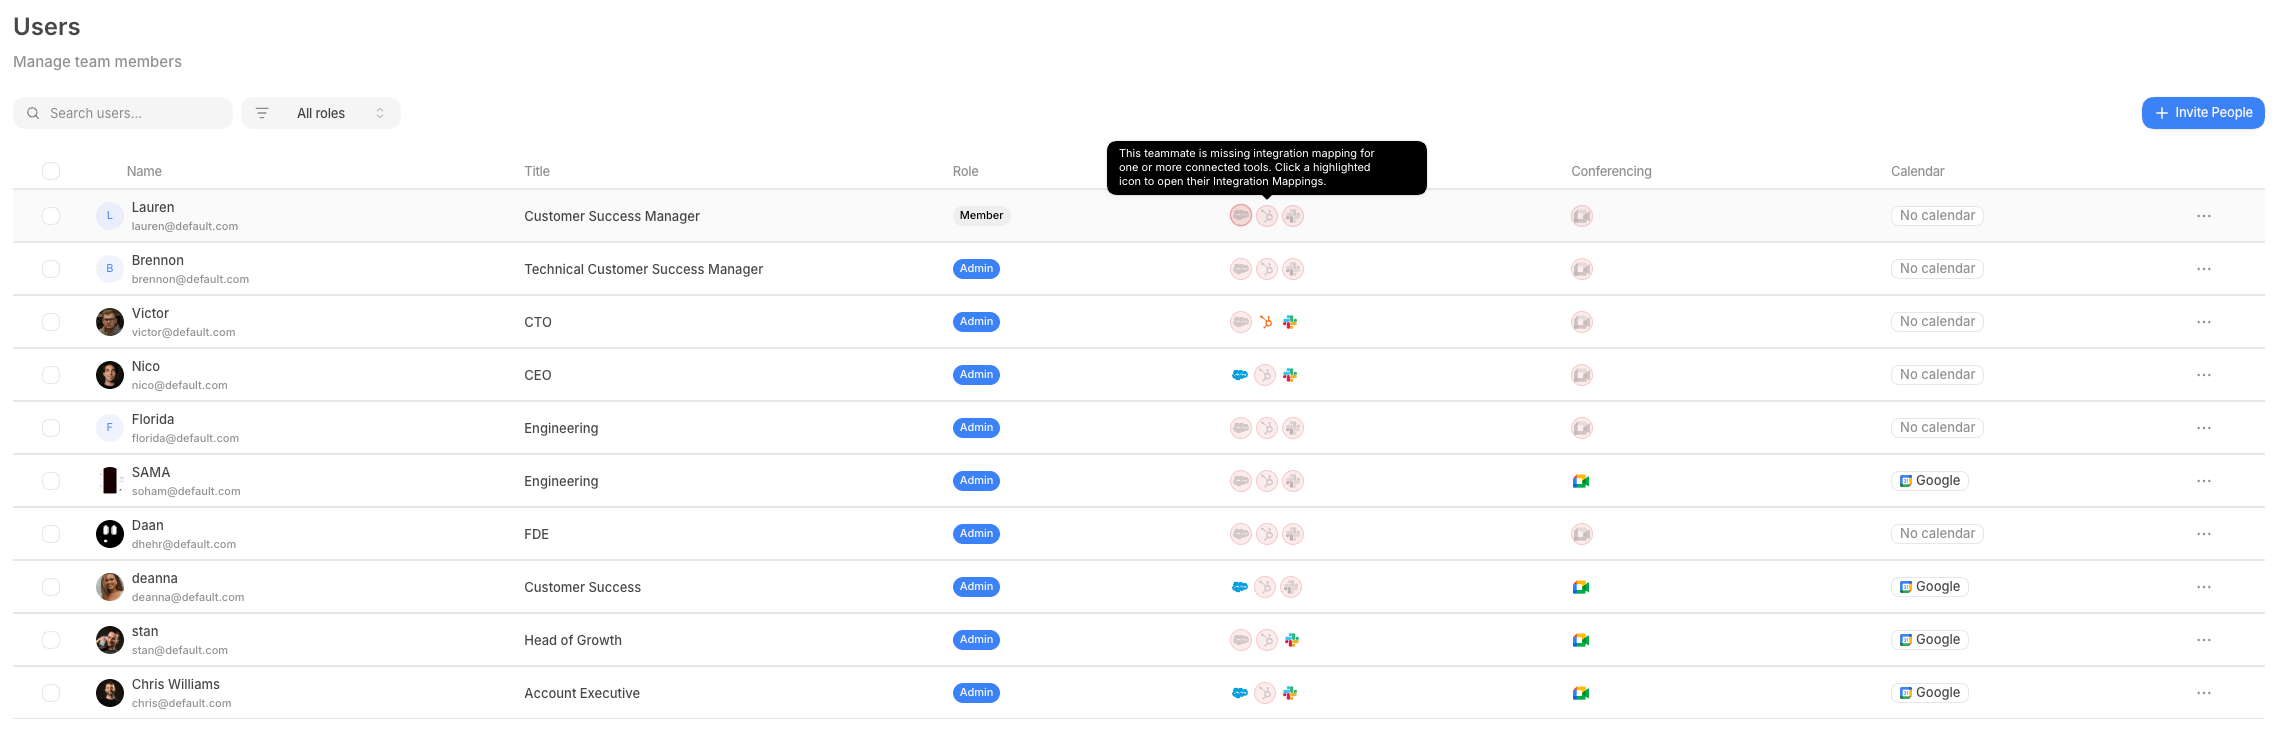
The **Users** page is where admins manage workspace membership: invite new teammates, review
who's connected to what, change roles in bulk, and drill into any member's profile,
availability, integration mappings, and notification preferences.
Open **Settings** from the **Dock** (the app bar at the bottom of the screen), then select
**Users** under **Workspace Settings**. Admin access is required to invite members, change
roles, or remove users.
 ## Toolbar
The toolbar sits above the members table and has three controls.
| Control | What it does | How to use it |
| ------------------ | ---------------------------------------------- | ------------------------------------------------------------------------------------ |
| **Search** | Finds members by name or email. | Type into the search field (for example, `jordan`) to filter the table in real time. |
| **Filter by role** | Narrows the table to a single role. | Open the role dropdown and pick **All roles**, **Admin**, or **Member**. |
| **Invite People** | Opens the invite dialog to add a new teammate. | Select **Invite People** and follow the invite flow below. |
### Inviting a teammate
Select **Invite People** in the toolbar. The **Invite to workspace** dialog opens.
Type the person's email address into the input field, for example,
`newrep@acme.com`. Default validates the address before letting you proceed.
Choose how to deliver the invite:
* Select **Send** to email the invitation directly. Default confirms with
"Invitation sent successfully."
* Select **Copy link** to copy the invite URL to your clipboard and share it
manually, useful for Slack or other channels.
Select **Done** when you're finished. The new member appears in the table once they
accept the invitation.
## Members table
The table lists every workspace member with their profile details and integration status.
Each row shows:
| Column | What it shows |
| ---------------- | ------------------------------------------------------------------------------------------------------------------------------ |
| **Name** | The member's avatar, display name, and email address. |
| **Title** | The member's job title from their profile. |
| **Role** | A badge (**Admin** or **Member**) showing the member's workspace role. |
| **Integrations** | Provider icons for connected CRM and sequencing integrations (Salesforce, HubSpot, Attio, Outreach, Salesloft, Slack, Apollo). |
| **Conferencing** | The member's active conferencing provider, Zoom or Google Meet. |
| **Calendar** | A badge showing the connected calendar provider (**Google** or **Outlook**), or **No calendar** if none is connected. |
Select the three-dot menu on any row you have permission to edit and choose **Edit** to
open that member's detail page.
The table paginates at 10, 20, or 50 rows per page. Use the **Previous** and **Next**
buttons, or change the **rows per page** selector, at the bottom of the table.
## Bulk actions
Select one or more members using the checkboxes in the table to reveal the bulk-action
bar. The bar shows how many members are selected and offers two actions:
| Action | What it does | How to use it |
| ---------- | ------------------------------------------------------------ | ------------------------------------------------------------------------------------------------------------------------------------ |
| **Role** | Changes the workspace role for all selected members at once. | Select **Role**, search or browse for **Admin** or **Member**, then pick the role. Default updates all selected members immediately. |
| **Delete** | Removes all selected members from the workspace. | Select **Delete** (trash icon) and confirm the removal dialog. This action cannot be undone. |
Selections persist across pages, so you can navigate to page 2, add more checkboxes, and
act on the combined set.
## Member detail pages
Selecting **Edit** from a member's row opens their detail page. The page has two main
sections: **User Details** and a **User Settings** nav list that links to three sub-pages.
### User details
The **User Details** section lets you view and, if you're an admin editing another member,
update that member's profile.
| Field | What it is | How to set it |
| ---------------------- | ----------------------------------------------------------------------------------------------------------------------- | ------------------------------------------------------------------------------------------------------------------------------ |
| **Username** | The member's display name shown on booking pages and invites. | Type a friendly name, for example, `Jordan from Default`. |
| **First name** | The member's first name. | Type it in. |
| **Last name** | The member's last name. | Type it in. |
| **Email** | The member's login email. | Read-only, tied to their login and can't be changed here. |
| **Job title** | The member's role, shown on scheduling surfaces. | Type it in, for example, `Account Executive`. |
| **Phone number** | The member's contact number. Adding one also enables the SMS notification channel, so it must include the country code. | Enter the full number with the country code and a leading `+`, no spaces or dashes, for example, `+15551234567`. |
| **Conferencing Setup** | The video conferencing platform used for this member's meetings. | Pick **Zoom**, **Google Meet**, or leave it as **None** from the dropdown. Only providers your workspace has connected appear. |
| **Role** | The member's workspace role. | Admins see a **Admin** / **Member** radio selector. Non-admins see their current role as read-only text. |
Admins editing another member's profile see an **"Editing as admin"** banner at the top of
the page. If that member has no calendar connected, a warning appears prompting you to ask
them to connect one.
The page also shows a **Danger Zone** section for admins. Select **Remove User** to remove
the member from the workspace. You can't remove yourself.
Select **Save** in the action bar to commit any changes. Default confirms with a success
message.
### User settings nav
Below User Details, a **User Settings** nav list links to three sub-pages for the member.
The links appear in this order:
1. **Integrations**: maps the member's Default user to their IDs in connected third-party
tools.
2. **Availability & OOO**: manages the member's working hours and out-of-office blocks.
3. **User Notifications**: manages the member's notification channel and type preferences.
#### Integrations
The **Integrations** sub-page shows an **Integration Mappings** form. Each card represents
a connected workspace integration and lets you map the Default user to their corresponding
ID in that system.
| Provider | What you map |
| -------------- | -------------------------------- |
| **Salesforce** | The member's Salesforce User ID |
| **HubSpot** | The member's HubSpot Owner ID |
| **Attio** | The member's Attio User ID |
| **Zoom** | The member's Zoom email address |
| **Outreach** | The member's Outreach Mailbox ID |
| **Salesloft** | The member's Salesloft Sender ID |
| **Slack** | The member's Slack User ID |
| **Apollo** | The member's Apollo Mailbox ID |
Only providers your workspace has connected appear. For integrations that support it,
a searchable picker populates from the live user list in that system, for example, you
can search Salesforce users by name rather than entering a raw ID. Default validates the
mapping value on blur and shows an error if the ID can't be found.
The **Integrations** sub-page is for mapping CRM and sequencing identities. It is not
where a member's calendar or conferencing OAuth connection is set up. Calendar connections
(Google Calendar, Outlook) and the active conferencing provider (Zoom, Google Meet) are
configured at the workspace level under **Workspace Settings → Integrations**, and the
member's active conferencing preference is set in the **Conferencing Setup** field on the
**Edit** page.
Select **Save** in the action bar to commit mapping changes.
#### Availability & OOO
The **Availability & OOO** sub-page shows the same availability form as the member's own
**Availability & OOO** user setting, rendered in an admin context. It covers personal
scheduling preferences (pre/post meeting buffers, notice period, vacation mode), the
member's primary calendar, and links to their **Working Hours** and **Out of Office**
sub-pages.
See **Availability & OOO** in User Settings for a full walkthrough of each control.
#### User notifications
The **User Notifications** sub-page shows the member's notification settings, the same
channel tabs (In-App, Slack, Mail, SMS) and notification-type toggles they see in their
own settings. Admin changes here take effect for that member within the limits set by
Workspace Notifications.
See **Notifications** in User Settings for a full walkthrough of the channel and type
controls.
## Toolbar
The toolbar sits above the members table and has three controls.
| Control | What it does | How to use it |
| ------------------ | ---------------------------------------------- | ------------------------------------------------------------------------------------ |
| **Search** | Finds members by name or email. | Type into the search field (for example, `jordan`) to filter the table in real time. |
| **Filter by role** | Narrows the table to a single role. | Open the role dropdown and pick **All roles**, **Admin**, or **Member**. |
| **Invite People** | Opens the invite dialog to add a new teammate. | Select **Invite People** and follow the invite flow below. |
### Inviting a teammate
Select **Invite People** in the toolbar. The **Invite to workspace** dialog opens.
Type the person's email address into the input field, for example,
`newrep@acme.com`. Default validates the address before letting you proceed.
Choose how to deliver the invite:
* Select **Send** to email the invitation directly. Default confirms with
"Invitation sent successfully."
* Select **Copy link** to copy the invite URL to your clipboard and share it
manually, useful for Slack or other channels.
Select **Done** when you're finished. The new member appears in the table once they
accept the invitation.
## Members table
The table lists every workspace member with their profile details and integration status.
Each row shows:
| Column | What it shows |
| ---------------- | ------------------------------------------------------------------------------------------------------------------------------ |
| **Name** | The member's avatar, display name, and email address. |
| **Title** | The member's job title from their profile. |
| **Role** | A badge (**Admin** or **Member**) showing the member's workspace role. |
| **Integrations** | Provider icons for connected CRM and sequencing integrations (Salesforce, HubSpot, Attio, Outreach, Salesloft, Slack, Apollo). |
| **Conferencing** | The member's active conferencing provider, Zoom or Google Meet. |
| **Calendar** | A badge showing the connected calendar provider (**Google** or **Outlook**), or **No calendar** if none is connected. |
Select the three-dot menu on any row you have permission to edit and choose **Edit** to
open that member's detail page.
The table paginates at 10, 20, or 50 rows per page. Use the **Previous** and **Next**
buttons, or change the **rows per page** selector, at the bottom of the table.
## Bulk actions
Select one or more members using the checkboxes in the table to reveal the bulk-action
bar. The bar shows how many members are selected and offers two actions:
| Action | What it does | How to use it |
| ---------- | ------------------------------------------------------------ | ------------------------------------------------------------------------------------------------------------------------------------ |
| **Role** | Changes the workspace role for all selected members at once. | Select **Role**, search or browse for **Admin** or **Member**, then pick the role. Default updates all selected members immediately. |
| **Delete** | Removes all selected members from the workspace. | Select **Delete** (trash icon) and confirm the removal dialog. This action cannot be undone. |
Selections persist across pages, so you can navigate to page 2, add more checkboxes, and
act on the combined set.
## Member detail pages
Selecting **Edit** from a member's row opens their detail page. The page has two main
sections: **User Details** and a **User Settings** nav list that links to three sub-pages.
### User details
The **User Details** section lets you view and, if you're an admin editing another member,
update that member's profile.
| Field | What it is | How to set it |
| ---------------------- | ----------------------------------------------------------------------------------------------------------------------- | ------------------------------------------------------------------------------------------------------------------------------ |
| **Username** | The member's display name shown on booking pages and invites. | Type a friendly name, for example, `Jordan from Default`. |
| **First name** | The member's first name. | Type it in. |
| **Last name** | The member's last name. | Type it in. |
| **Email** | The member's login email. | Read-only, tied to their login and can't be changed here. |
| **Job title** | The member's role, shown on scheduling surfaces. | Type it in, for example, `Account Executive`. |
| **Phone number** | The member's contact number. Adding one also enables the SMS notification channel, so it must include the country code. | Enter the full number with the country code and a leading `+`, no spaces or dashes, for example, `+15551234567`. |
| **Conferencing Setup** | The video conferencing platform used for this member's meetings. | Pick **Zoom**, **Google Meet**, or leave it as **None** from the dropdown. Only providers your workspace has connected appear. |
| **Role** | The member's workspace role. | Admins see a **Admin** / **Member** radio selector. Non-admins see their current role as read-only text. |
Admins editing another member's profile see an **"Editing as admin"** banner at the top of
the page. If that member has no calendar connected, a warning appears prompting you to ask
them to connect one.
The page also shows a **Danger Zone** section for admins. Select **Remove User** to remove
the member from the workspace. You can't remove yourself.
Select **Save** in the action bar to commit any changes. Default confirms with a success
message.
### User settings nav
Below User Details, a **User Settings** nav list links to three sub-pages for the member.
The links appear in this order:
1. **Integrations**: maps the member's Default user to their IDs in connected third-party
tools.
2. **Availability & OOO**: manages the member's working hours and out-of-office blocks.
3. **User Notifications**: manages the member's notification channel and type preferences.
#### Integrations
The **Integrations** sub-page shows an **Integration Mappings** form. Each card represents
a connected workspace integration and lets you map the Default user to their corresponding
ID in that system.
| Provider | What you map |
| -------------- | -------------------------------- |
| **Salesforce** | The member's Salesforce User ID |
| **HubSpot** | The member's HubSpot Owner ID |
| **Attio** | The member's Attio User ID |
| **Zoom** | The member's Zoom email address |
| **Outreach** | The member's Outreach Mailbox ID |
| **Salesloft** | The member's Salesloft Sender ID |
| **Slack** | The member's Slack User ID |
| **Apollo** | The member's Apollo Mailbox ID |
Only providers your workspace has connected appear. For integrations that support it,
a searchable picker populates from the live user list in that system, for example, you
can search Salesforce users by name rather than entering a raw ID. Default validates the
mapping value on blur and shows an error if the ID can't be found.
The **Integrations** sub-page is for mapping CRM and sequencing identities. It is not
where a member's calendar or conferencing OAuth connection is set up. Calendar connections
(Google Calendar, Outlook) and the active conferencing provider (Zoom, Google Meet) are
configured at the workspace level under **Workspace Settings → Integrations**, and the
member's active conferencing preference is set in the **Conferencing Setup** field on the
**Edit** page.
Select **Save** in the action bar to commit mapping changes.
#### Availability & OOO
The **Availability & OOO** sub-page shows the same availability form as the member's own
**Availability & OOO** user setting, rendered in an admin context. It covers personal
scheduling preferences (pre/post meeting buffers, notice period, vacation mode), the
member's primary calendar, and links to their **Working Hours** and **Out of Office**
sub-pages.
See **Availability & OOO** in User Settings for a full walkthrough of each control.
#### User notifications
The **User Notifications** sub-page shows the member's notification settings, the same
channel tabs (In-App, Slack, Mail, SMS) and notification-type toggles they see in their
own settings. Admin changes here take effect for that member within the limits set by
Workspace Notifications.
See **Notifications** in User Settings for a full walkthrough of the channel and type
controls.